BOOK SESSION

Understanding Cycling Posture: Are you a dysfunctional onion? Part 1: Be There

Posture Triangle®                                                                   …

Posture Triangle®                                                                                                                         PEDALFITPT.COM

Posture: The Bottom Bracket of Cycling Well

It is time to actually understand posture beyond the “sit up straight” and “don’t slump” mentality. Poor posture is a combination of environmental interaction and habits that mold us into onions over time. In most cases, dysfunctional onions. What do I mean by a dysfunctional onion? Well, I mean layers and layers of restrictions that make up our smelly, sticky postural problems. When we finally start to peel away at them a few involuntary tears come to our eyes. It is time to start chipping away at them. 


There is a lot of noise in the fitness community about mobility, stability and standing desks. This leads to what I like to call Forest Gumping your way into posture. Unfortunately, it is not realistic to just run out of your poor-posture-cast one day onto an Alabama football field where you go on to win a National Title. Be efficient and effective by understanding what you should actually be mobilizing and stabilizing and when to initiate such an individual prescription. 


Stop bargaining with your body. Ignoring posture leads to dysfunction, dysfunction lead to injury and injury leads to time away from the bike. If you "fix" the injury without changing the underlying problem, posture, then you cycle right back into the problem. In a unique high demand sport such as cycling you accelerate the growth of the layers of your dysfunctional-onion more rapidly than with other activities. This may come as a surprise to some folks who chose cycling for the low impact nature of the sport. Of course I am a proponent of having a bike fit but this is where my service and philosophies may differ from the standard methods. Your position on the bike is only a goal if you crumble after 30 minutes in the saddle. 


I developed the Posture Triangle®, shown above, to help you understand the unique demands of cycling and decide where to start in your endeavor. This is a good way for coaches, trainers, health care professionals and cyclists to communicate about posture. Let go of what you think you know and hold on tight. This is the bottom bracket of being a better rider. We all love talking about bike geometry, now it’s time to talk about our geometry. 

1.  Be There

  • Self Assessment

  • Awareness

  • Environment

Your first question should be where is "there"? I'll spare you some of the details on this post because the amount of information coming your way on neutral spine posture in the future is immense, but the concept is simple.  "There" is the place where your bones are supposed to live to decrease the impact of gravity. If your bones live in the stasis that is neutral then your muscles, joints, and ligaments are not under un-natural strain and stress. If you are unable to find proper alignment then you will have unnecessary fatigue, muscular strain, tightness and in later stages, pain. Finding neutral posture is more complicated than you have traditionally been taught. It's not just a matter of sticking out your chest and jamming your shoulder blades together. In fact, that is called "military posture" and it is equally dysfunctional. Finding the balance of proper alignment will take some cognitive load and 30 minutes of your time today. Drop what you are doing and start now. Print out this post and make notes all over it. Tag us in your masterpiece @pedalfitpt on Instagram or Facebook, and enter to win a Pedal Fit session! 

Self-Assessment in Standing: Day 1

My name is (______________) and I have bad posture. This week is about owning up to your flaws. You can't change them until you recognize them. Doing generic postural exercises is inefficient, learn about yourself and make the changes that are specific to you. 

  ASSESSING POSTURE WITH A DIY PLUMB LINE

  1. Gather up a few items
    1. A device to snap a photo
    2. A friend who can use the device to snap a photo
    3. String that is at least 1 foot longer than you 
      1. If you have a plumb line and plumb bob you can skip the last items
    4. At least two pieces of tape. The type does not matter
    5. A key, quarter or other object to tie/tape onto the bottom of the string
  2. Make a plumb line by attaching one of the items to the end of the string
  3. Tape the plumb line in a door frame or on the ceiling for you long armed folks. The object at the end of the string should pull the line straight to indicate a straight gravity line. Just like your curtains, you want the object to just meet the floor. 
  4. Take 3 photos in your normal posture. Do not attempt to make the corrections that you think are desired. You want a true understanding of your posture. 
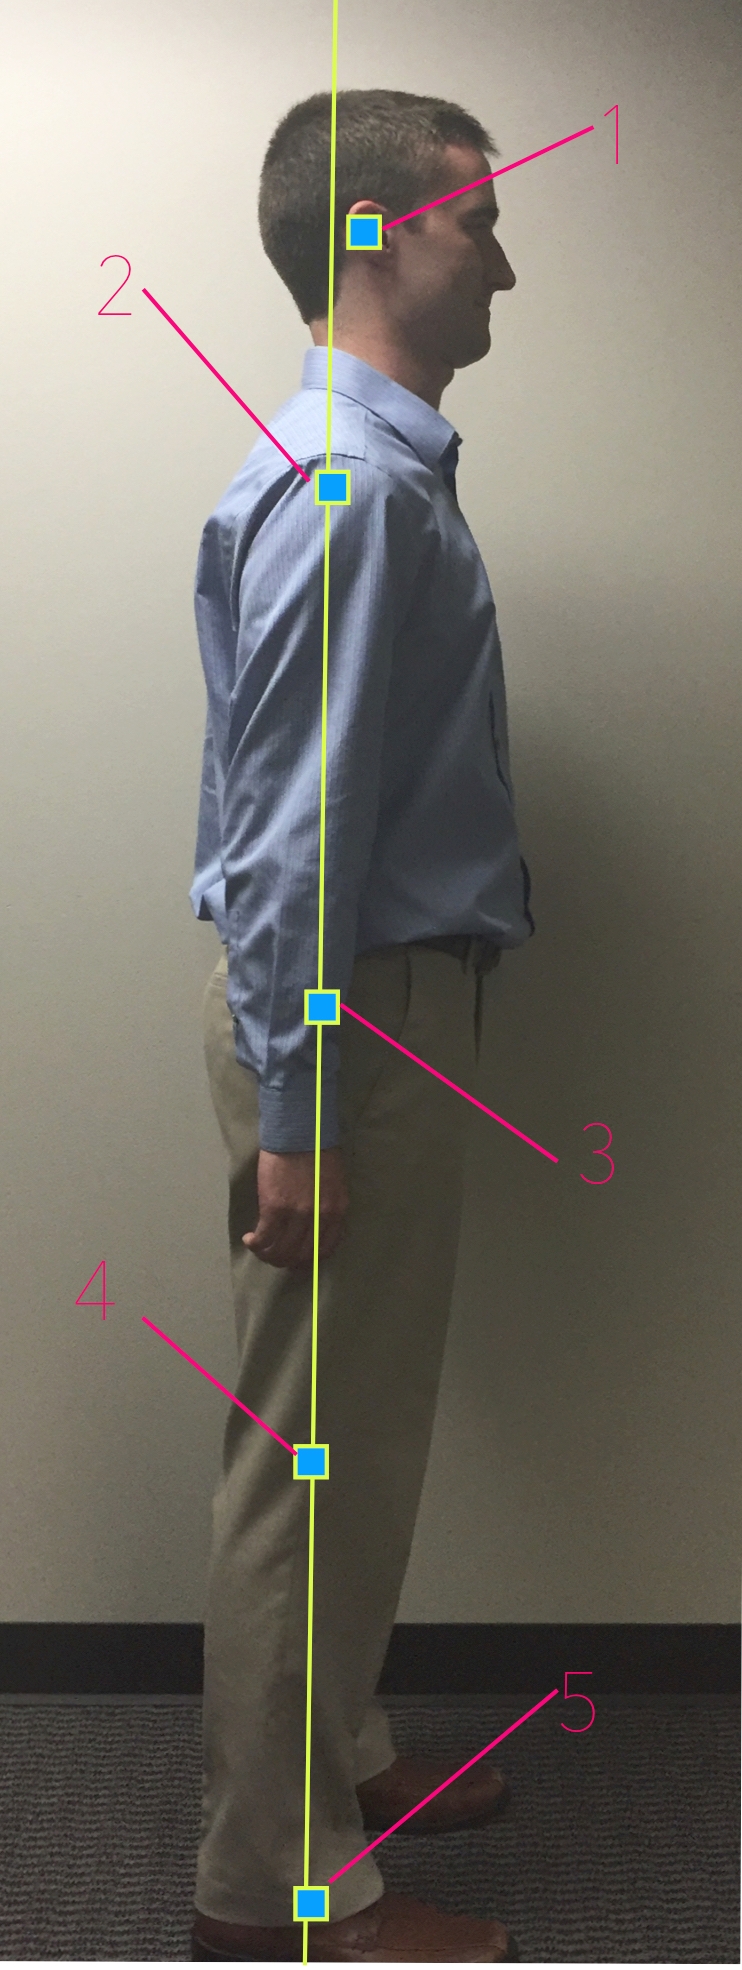
    1. SIDE VIEW: Line up the plumb line just anterior (in front) of the lateral malleolus of the ankle (prominent bone on the outside of the ankle). 
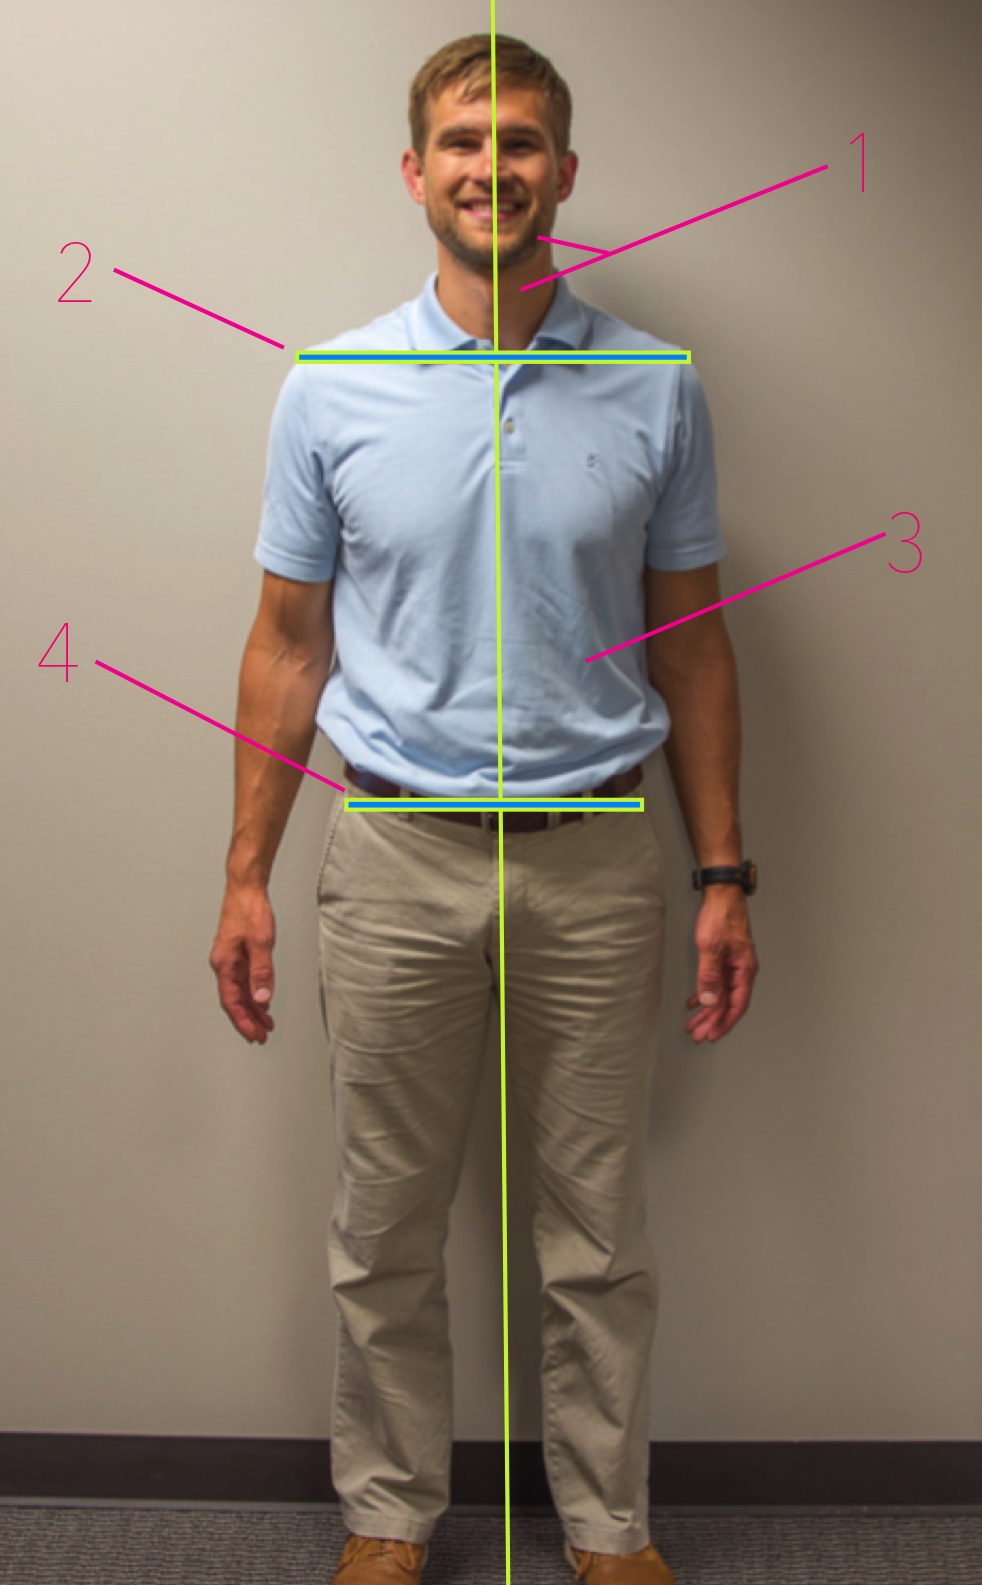
    2. FRONT VIEW: Place your feet equidistant apart and to each side of the plumb line while facing forward. 
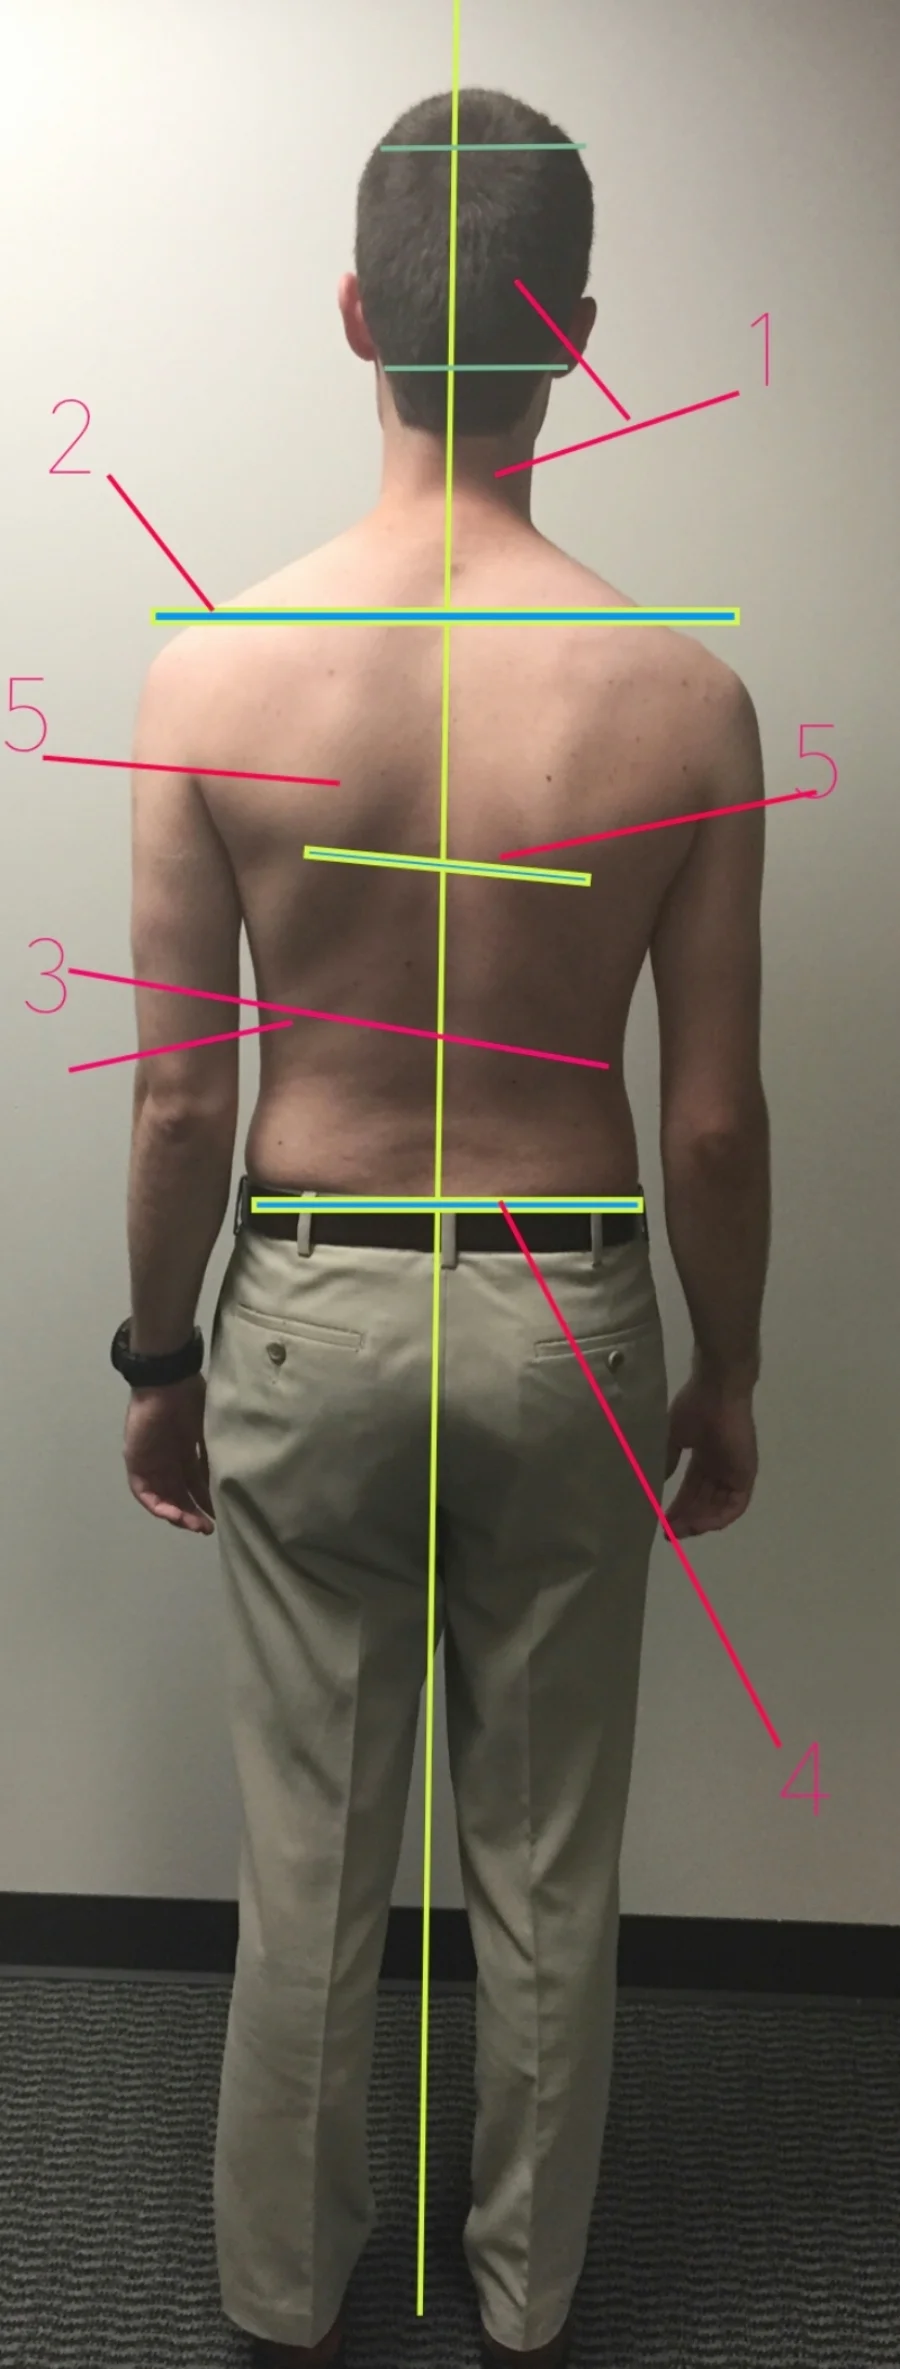
    3. BACK VIEW: Place your feet equidistant apart and to each side of the plumb line while facing with your back to the line. 
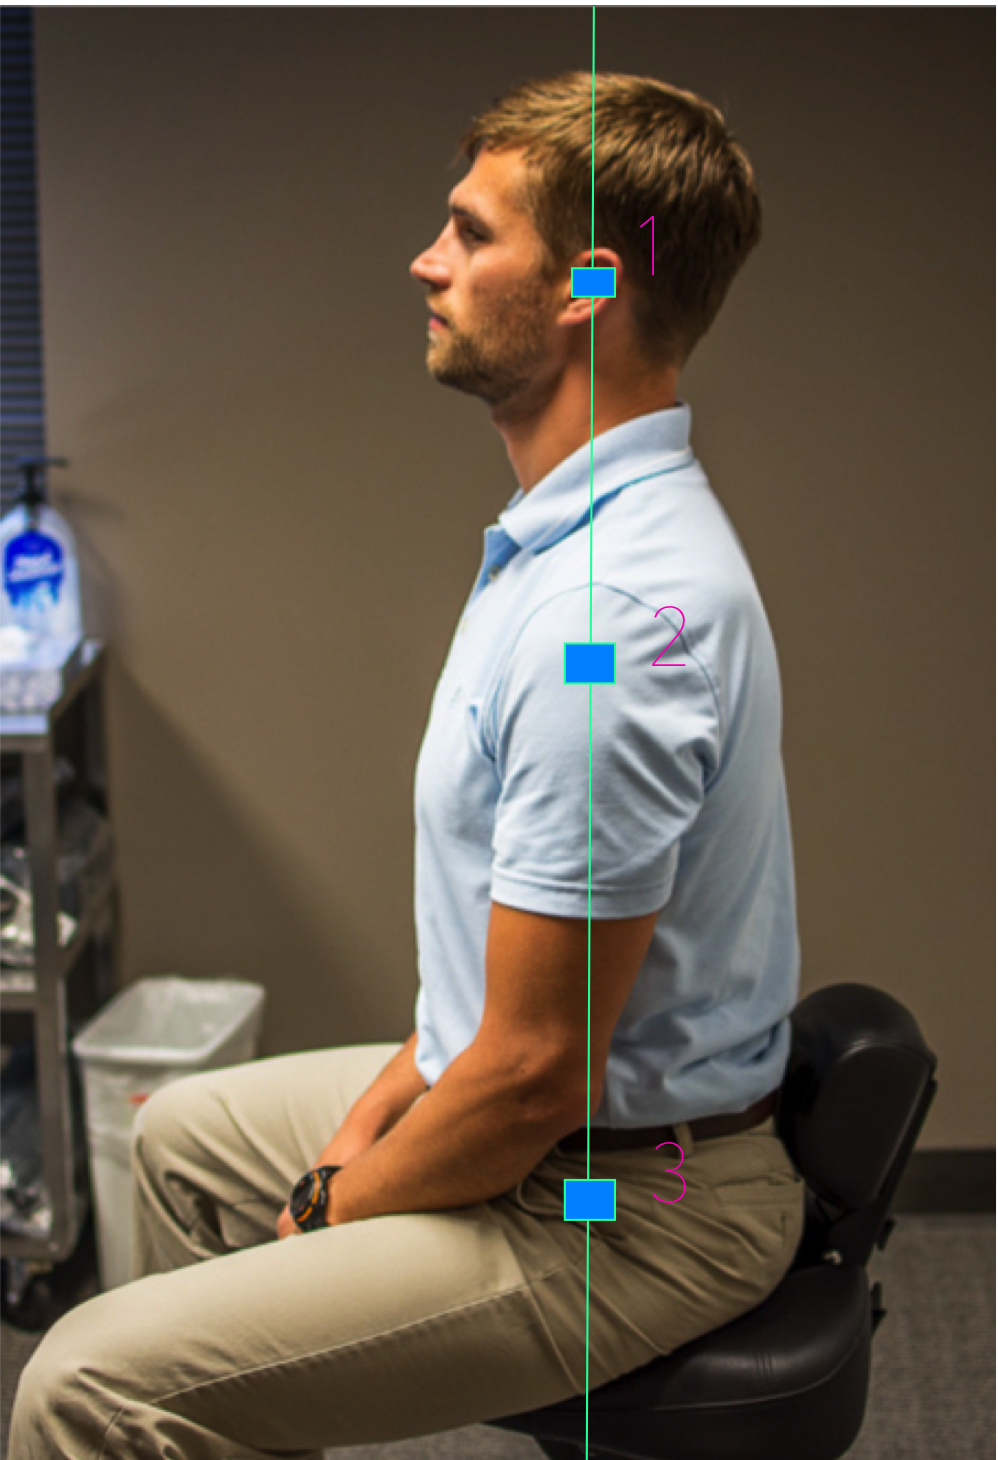
    4. BONUS: Have someone take a picture of your sitting posture at work. Or your standing desk set up.

Side View Assessment

1. External Auditory Meatus (entrance of ear canal)

2. Midway through the shoulder

3. Slightly posterior (behind) the center of the hip joint

4. Slightly anterior (in front) of the axis of the knee joint

5. Slightly anterior (in front) of the lateral malleolus (plumb line reference) 

***The other alignment points are not included as they are difficult to identify without proper training. Additionally, there is a desired curvature of the cervical, thoracic and lumbar areas of the spine. We will discuss this further in future posts. For now assess overall posture as it relates to gravity. 

Front & Back View Assessment

  1. Check the relationship between your head and neck.
    1. Does your head tilt to one side.
      • Possible upper cervical restriction
    2. Does your neck lean to one side?
      • Possible mid to lower cervical restriction
    3. Is your head to centered over your neck?
      • Various restrictions possible
  2. Check the relationship between your shoulders. 
    1. Are they level
    2. Do they jut out more on one side? Meaning is there more of your chest and shoulders on one side compared to the other?
      • Possible shoulder or thoracic restrictions
  3. Check the symmetry of the curves of your sides. Use your umbilicus (belly button) for a reference point if possible.
    • You have to look close for this one but it can tell us a lot. (scoliosis, functional and/or structural leg length, lumbar dysfunction causing over use of quadratus lumborum, preference of weight bearing on one leg and much more. 
  4. Check to see if your pelvis is level or off center.
    • Similar to #3 you can learn a lot about yourself by the plane of your pelvis. 
  5. Check the symmetry of your shoulder blades. If possible look at the borders of each shoulder blade. Is one higher? Tilted? Further from the spine? Are the borders of one shoulder blade more prominent than the other? 
  • We will stop at the trunk for now. It is important to assess the lower extremities but my goodness look at the time, 30 minutes is almost up. 


Self-Assessment in Environment: Day 2-5

  • MAKE IT ROUTINE: Now that you know where "there" is start to assess how you interact with your environment. Be mindful during daily standing activities such as waiting in line at the grocery store, cooking, brushing your teeth etc. Where do you need to improve? 
  • SIT/STAND RATIO: Once you know how junkie your standing posture is check out the ratio of sit/stand time.
  • SLEEP STANDING UP: If you are sleeping with your chin jutted forward resting on your fist and knees in your stomach you are essentially sitting all night. We typically sleep in the position we are in most throughout the day. If this is you then consider a standing desk to unwind your sticky joints and soft tissue during the day.  If you want to tolerate a better sleep position you need to create a better environment for your posture during the day. I gave you 2 days to either order a standing desk or come up with a solution. (see below for a standing desk and free DIY solution)
  • SIT WELL AND MOVE OFTEN: If a standing desk is not an option for you then take up some other good strategies to improve your resting posture while you sit, work and focus. Move your body every 40 minutes, period.
  • BE A GOD or GODDESS: This seems simple and boring but if you continue to water your dysfunctional-onion all day and night then do not expect to be a performance god or goddess on the #singletrack rock gardens. 

Self-Assessment Final Steps: Day 6

  • Pay attention to the position of your pelvis in sitting and standing
    • Anterior, posterior and neutral 
    • Determine if you are sitting evenly on both ischeal tuberosities (sit bones) 
  • Do you stand with more weight on 1 leg? 
  • How often is your head dropped to look at your phone or other device? 
  • How often are you sitting with your legs crossed? Or one leg tucked under the other? 
  • How do these positions relate to your plumb line comparison?

Awareness: Day 7 

  • Be mindful of what you learned Day 1-6. This is the calorie-counting equivalent of postural perfection.
  • What is hard and what is easy?
  • What are the barriers for you? Does your job require insane amounts of focus?
  • Do you feel the need to dirty slump with your nose touching the monitor?
  • Is your couch a hammock?
  • Do you need to set an alarm to get your hind-end up every 40 minutes?  


2. Get There

  • Self Assessment Continues

  • Mobility

Once you identify if you are "there" you can start to understand where you are falling apart, I mean off track. Now we get to have some fun working on your sticky bits. You know me better than to think I would give you these juicy nuggets too early.................... stay tuned to next week. 


3. Stay There

  • Stability Introduction

  • Postural Endurance

4. Stay There Under Load

  • Stability

  • Postural Endurance

  • Motor Control

5. Stay There While COG Changes 

  • Proprioception

  • Mobility (beyond the neutral static posture)

  • Stability

  • Motor Control

  • Strength

  • Endurance

6. Go Ride a Bike!

While you hold it all together, of course. 


Cycling Road Rash; Wound Care Bonus Edition

Less is More

There is a right way and a disastrous way to start the care for your gnarly abrasion.  Less is more when it comes to road rash and cycling battle-wounds.  First, clean with saline or water, only if possible.  Nothing else unless you crash into a pile of roadkill, which likely did not happen.  Ensure the wound is clean of bacteria and debris to start with but be gentle.


Avoid Man Made Agents

If your wound looks pretty and red. STOP! Resist the urge to harm it. Almost all man made agents kill white blood cells, aka cause big problems from the get go.  The long standing myth is that the bubbles of hydrogen peroxide have magical powers.  FALSE! Hydrogen peroxide is cytotoxic (harmful) and barely bacteriostatic, meaning bacteria is not afraid of those little bubbles.  A few examples of cytotoxic chemicals include: alcohol, Betadine, anti-bacterial soap. If you just absolutely have to clean it with something use a gentle soap, only once. 

Transparency is Key

Take a photo to help with daily tracking of the healing.  Feel free to post it on Instagram for street cred, but make sure to #pedalfitpt.  Cover the wound with a clear bandage such as 3m Nexcare Tegaderm (transparent film), OpSite flex grid (you may have to order online), or Duoderm (unfortunately not transparent).  

Stop with all the Ointments

Before you follow your gut and coat the wound with ointment.  STOP! Ointments, such as Neosporin and Polysporin, are not always the answer you think they are.  Ointments are essentially grease traps for your otherwise happy and healing wound.  The effects only last a few hours or so and after that they arrest the good and attract the bad.  Your wound requires healthy natural cell and enzyme migration (movement). If these key players are unable to move freely they will not be able to fight off bacteria and rebuild skin.  Ointments also may cause discoloration of the wound which makes it hard to discriminate healthy and infected tissue.  If used, the ointment should be removed after a few hours with saline. 

Let It Be

From this point on, let your wound heal itself.  The best part about the bandages/dressings I recommend is that they can be left on for several days and are transparent.  This keeps the wound environment moist with it’s natural fluid. It keeps bacteria from entering the wound.  Allows for bathing without stripping the wound of it’s integrity. And most importantly, allows for ongoing monitoring.  

Ignore the “air it out” Mentality

There are many myths when it comes to wound care but the worst is to “air it out” and “dry out the wound”.  Your body has a job to do in the wound, allowing it to dry out blocks transport of all that is good about wound healing.  Areas such as hands, feet and face are a little more difficult.


Get Real Advice!

If you are reading this in time, great! If not don't worry. I have made a detailed guide. Follow these steps to get back in the saddle without infection, loss of flexibility of the affected joints, and in time for your next event. As you know it is always best to consult a qualified health care professional. Yes, I am a qualified health care professional, writing this blog for people like you. However, I have not seen your wound. There may be intrinsic and extrinsic involved in your healing. Be safe and get help. 

DAY 1-10 “Damage Control”

Your new wound will start to feel tight, extremely sore to touch and will limit your range of motion.  This happens because healing occurs in 2 ways, contraction and re-epithelization. Basically the periphery (outside) of the wound starts to close in, while cells/enzymes clean up and rebuild within the wound.  Despite previous misconceptions, normal inflammation is not our enemy when it occurs as it should.  Inflammation is our bodies natural alarm; it calls in the clean up and repair crew.  As you take on the task of inspecting and maintaining your wound, it is important to know the difference between natural inflammation and infection. 

Signs and Symptoms of Infection

  • Change in mood, depression
  • Fatigue 
  • Suppressed appetite (my theory is a strange and overwhelming need for SUGAR!)
  • Fever
  • Redness around the borders of the wound
  • Red lines or streaking coming from the wound
  • Change in color of the-especially yellow turning to green or blue
  • Change in rate of healing
  • Increased drainage (check color)
  • Increased pain or tenderness 
  • Foul odor (keep in mind all wounds have a smell)
  • Failure to produce evidence of healing tissue
  • Increased temperature

DO and DO NOT of DAMAGE CONTROL

DO: 

  • Insulate and protect the wound. Our skin’s primary job is to insulate and protect our organs. When it’s missing we must do this for it. Use the bandages I mentioned in the first paragraph.
  • Perform GENTLE range of motion exercise. The wound is weak at this time. The point of doing range of motion exercises is not to tear the tissue or stretch. Did you hear me? DO NOT STRETCH. Instead what you want to do is move the joint in a way that is not painful. Movement at this stage prevents further limitations in movement as the area repairs itself and brings healthy blood flow. 
  • Inspect your wound
    • What do these colors mean when referring to the inside of the wound?
    • RED in the wound bed, means go. Red is good. Red says cover me and leave me alone I’m doing just fine on my own.  Red/Pink is not a good signs if talking about a ring around the wound. 
    • YELLOW means slow and slough. Not sloth the cute little creature. Slough indicates necrotic tissue (death) or the result of some ointments. This is not always an indication of infection. Regardless, yellow means that healing is slowed down. The cells/enzymes can not move freely as they need to. 
    • BLACK- black leathery tissue is called eschar. Eschar is also necrotic tissue that has dried and acts as a barrier for healthy healing. 
    • BLUE or GREEN- It is time to see your doctor. These colors could mean you need treatment. (see below for a list of possible treatments)
  • Nutrition considerations from the dietitian Lauren Collins, RDN
    • At least 8-10 glasses of 8oz of water
    • 25-35 calories per kg of body weight
      • 1 kg equals 2.204 pounds 
      • pounds/2.204 x 25 or 35
    • 1.5 to 2.5 grams of protein per kg body weight
      • pounds/2.204 x 1.5 to 2.5= amount of protein for wound healing
    • An extra: 500 mg of vitamin C, 200 mg of zinc, 400 of magnesium and iron
      • This is about what you would get in a multi-vitamin
      • Lauren says bell peppers and berries are good for vitamin C while mushrooms and shell fish are good for zinc. 

DO NOT

  • Do not touch it! Not with your finger, or the metal object you cleaned with fire. Seriously, just don’t. It’s fragile. 
  • Avoid pressure or restrictive clothing. 
  • Avoid extreme temperatures, hot and cold. As well as UV exposure
  • Do not soak the wound. This will cause maceration making the healing tissue weak and stripping the wound of everything that is good. 
  • Do not let the wound dry out. It is a myth that wounds need to be “aired out”. Following the recommendations for bandages will help keep the wound environment friendly. 
  • Do not stretch forcefully
  • Do not use man made products unless instructed to do so by a qualified health care professional. 
  • Do not place dry gauze on the wound while it is wet. It may damage the integrity when removed. You wouldn’t lick a metal pole in the winter, would you?

Wound care Q and A

Q: What are intrinsic and extrinsic factors that slow healing? 

A:

  • Intrinsic factors: 

    • Disease processes such as diabetes 
    • Age
    • Decreased circulation
    • Malnutrition
    • Smoking
  • Extrensic
    • Steroids, certain medications
    • Excessive pressure
    • Harmful chemicals
    • Poor use of dressings
    • Infection

Q: What are the potential treatments, by a qualified health care professional, for infection?

A: 

  • Antibiotics 
  • Sharp debridement
    • This sounds painful but it should not be. Sharp debridement is the selective removal of dead tissue only. Find a clinic that specializes in wound care and offers sharp debridement. This is usually done by a Physical Therapist
  • Wound Cleansing- This is the non-selective removal of the good and bad with specific agents.  Your qualified health care professional should be the one to tell you what to use. 
  • Irrigation- This is often selective and helpful in the same way that sharp debridement is. 
  • Specialized wound dressings. Often by prescription only and can be expensive so you want to involve the insurance if possible. 

Q: What does aging have to do with wound healing? 

A: 

  • As we age skin irritation lasts longer
  • There is increased risk of skin shearing and repeat offenders due to changes in our skins integrity. 
  • As we age we actually feel less pain in the skin. Pain is a protective mechanism to tell us to “stop”. This makes it easier to aggravate the wound. 
  • It is harder to diagnose infection in an older adult

Answering the call of cycling knee pain. Stop foam-rolling and listen up.

tfl part 1: self-assessment 

Are you someone who struggles with hip or knee pain on or off the bike?  Have you been diagnosed with "IT band syndrome"? Stop torturing your iliotibial band (IT-band) with a foam roller and LISTEN UP. Tensor fasciae latae (TFL) is not just a difficult term to say it is a difficult muscle. In fact, TFL can be a big problem early in the season for those of us who have been cross training (running, swimming, or doing our Navy Seal training). It is likely also problematic for those who have been off of the bike since the first flake of snow… 

Shown above: Soft tissue massage to tensor fasciae latae (TFL). 

Shown above: Soft tissue massage to tensor fasciae latae (TFL). 

Why

TFL tends to be a bit overbearing. Meaning the body over utilizes it in certain cases such as:

  • Weakness of gluteus minimus and medius 
  • Limited hip range of motion
  • Weakness of hip extensors (TFL works because other muscles do not) 
  • Femoral anteversion (the femur drops into internal rotation and adducts/ "knock knee" position)
  • Overutilization of vastus lateralis (quadriceps muscle/outside of thigh)
  • Lumbar spine dysfunction
  • Limited hip mobility
  • History of knee injury requiring TFL to work overtime for stabiity

What/when

These problems are typically made worse during weight bearing activities as the TFL is responsible for stabilizing the knee and pelvis when the opposite foot is raised off of the ground or when on an unstable surface. If you take a tight and overbearing TFL into the cycling season you could end up with big problems. You may find that you have recurring knee or hip pain each year or develop it after cross-training or running. A tight TFL alone may not be problematic but when mixed with bike fit problems it is a season ending injury waiting to happen. Traditionally, the TFL is ignored when it comes to cycling, it is time that stops!

Where

Anatomically, TFL is located in the anteriolateral (front and side) of the thigh connecting the pelvis to the femur (thigh). TFL attaches the Iliotibial band (ITB) at the anteriolateral portion of thigh and inserts proximal to the lateral femoral condyle (thigh bone). The ITB runs the length of the side of the thigh and is known to be a problematic tissue for many folks. ITB is the most direct tissue relationship connecting the TFL muscle to the knee. Get the picture? Think of the TFL as the Wizard in "The Wizard of Oz". It is an honorary little thing up to no good, perched up in the hip blaming everything on IT band and friction. It's time to pull back the curtain. 

Be Responsible 

Take on this TFL self diagnosis project responsibly. Try the simple test below to determine if you are a victim of the Wizard TFL. If this information speaks to you or the test below is indicative of a tight TFL, do yourself a big one and consult with a qualified health care professional! As with any medical advice you read on the internet this is not specific to you and should be interpreted accordingly, unless of course you yourself are a qualified health care professional. 

Test Yourself 

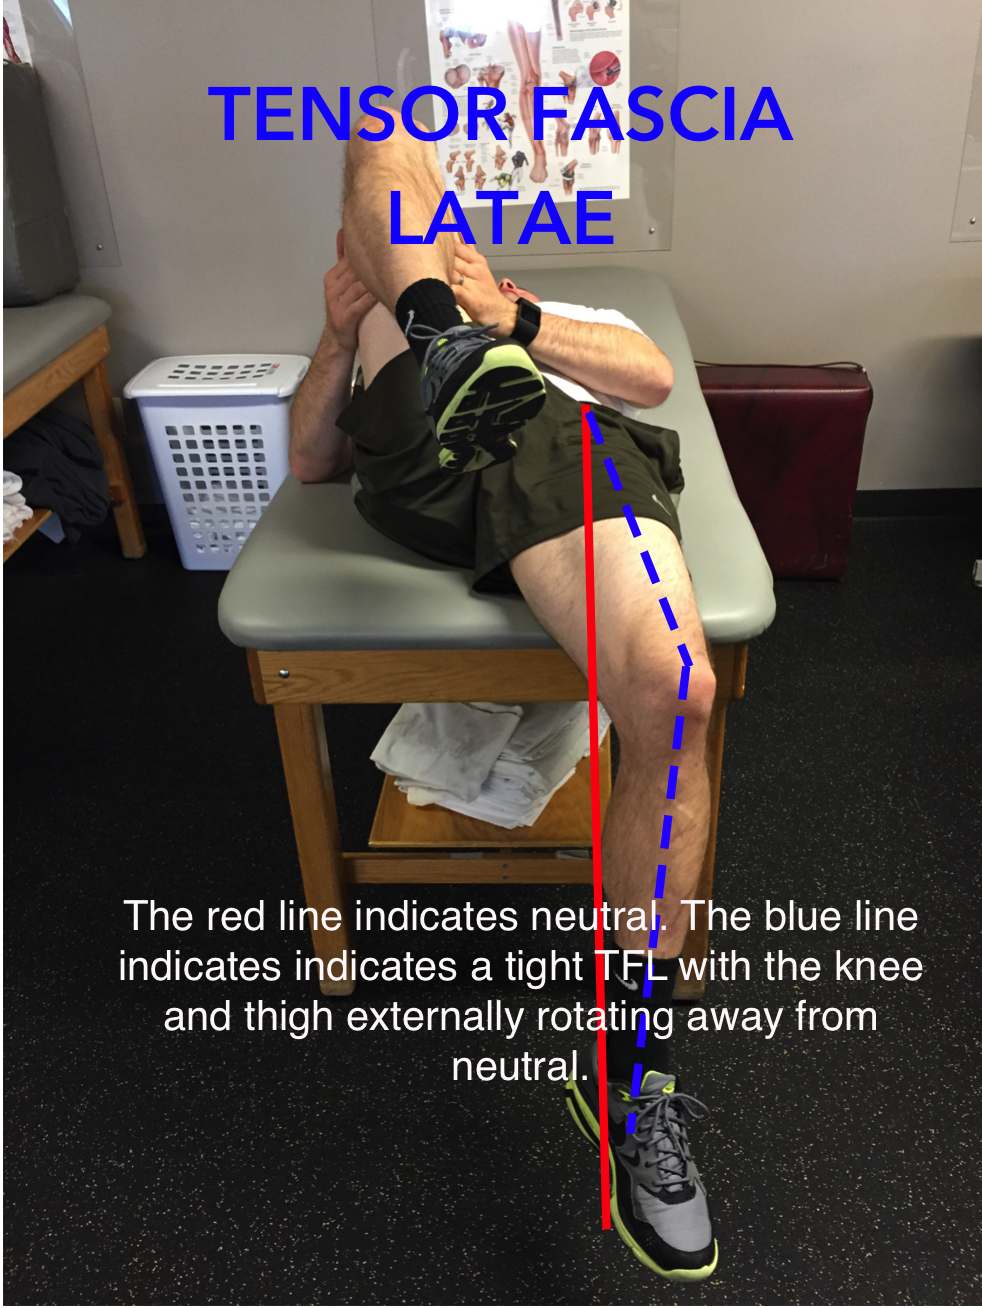
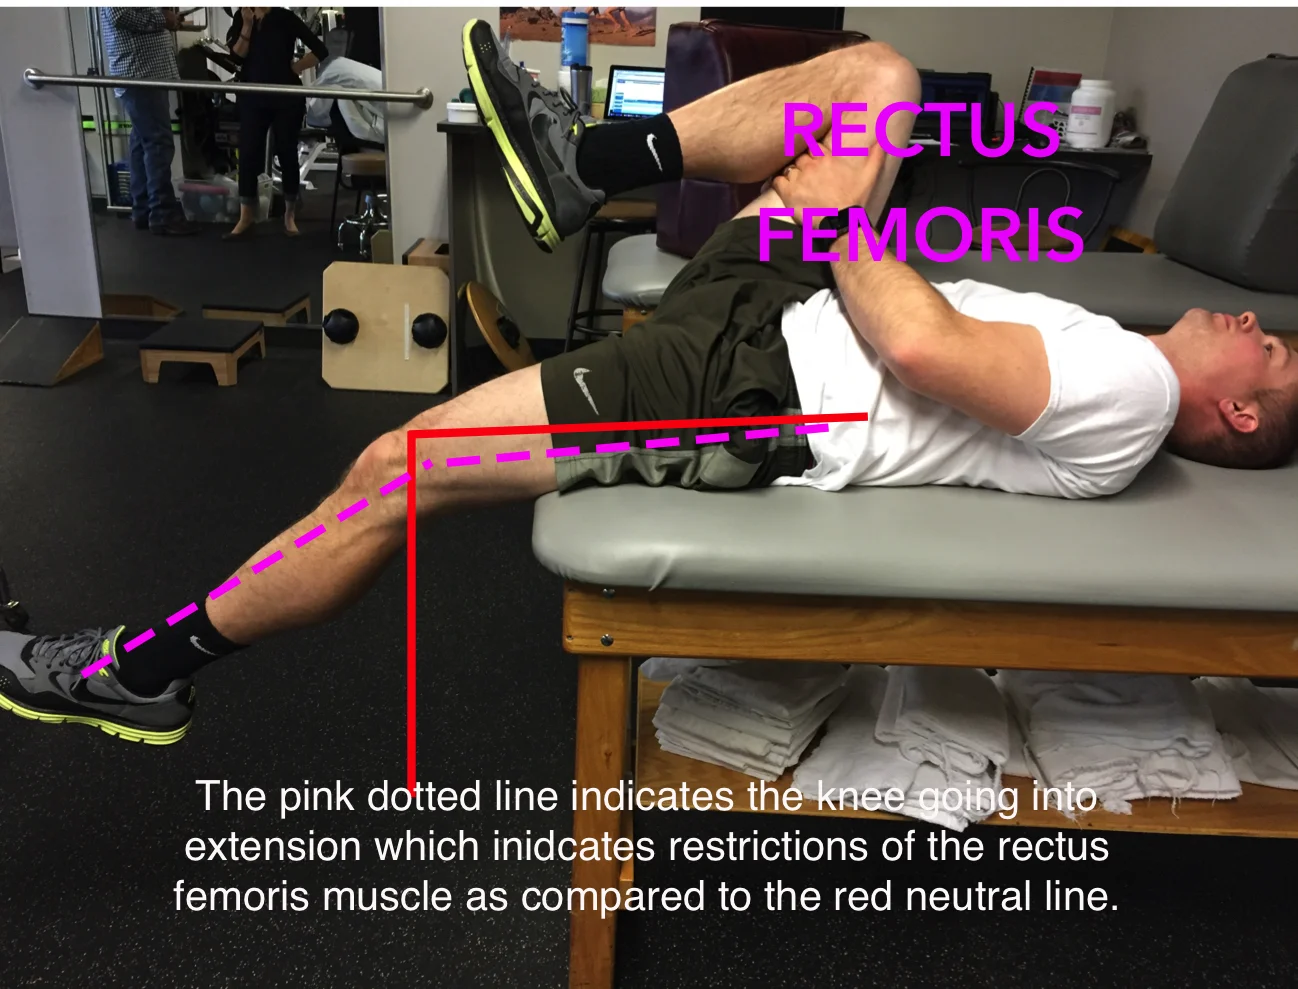
Introducing the Thomas test for testing the tensor fascia latae and as a bonus you can learn about the iliopsoas, rectus femoris and sartorius (not shown below) which also relate to knee pain.  


Negative test: If you are able to go through full range of motion (as shown in picture below) and the lower back and sacrum remain on the table. The pelvis can tilt only 10° and the hip can extend 10°. The hip remains in neutral and the thigh is resting against the table with the knee in 90° (like a perfect "L"). Basically, if you look like the picture below. 

Positive test: You may find that you are restricted in multiple ranges of motion of either the hip and knee. The pictures and descriptions shown above should help to determine which structure/s may be involved. Either watch yourself in a mirror or have someone else snap a picture with your phone. Take the pictures from both the front and sides so you can check the position of your back, pelvis, hip and knee. Happy testing and feel free to shoot me your images for further review. 

Stay Tuned

After careful consideration this will be a 3 part "Tackle the TFL" write-up. Coming soon are 2/3 and 3/3 for a bit more guidance. In the mean time consider that knowledge is powerful and dangerous. If you find that you are positive for the Thomas test shown above, take responsible action. If you are even more confused by your knee, hip or back pain then leave a comment below or shoot me an email at natalie@pedalfitpt.com. 


Caution about the Thomas test

It is important to remember that this test is not intended to diagnose a problem as research shows that is not the intention of this test. Instead, the test is an easy way to perform a self assessment. Use this test to identify restrictions and then re-test after you have addressed the issue. If you do not find the relief you are looking for then there is likely an underlying cause of the restrictions such as: lower back dysfunction, hip impingement, patello-femoral pain syndrome, among others. This means that something else is causing these muscle to tighten up. Reducing muscle restrictions will then only be temporary until you address the underlying cause.